
How to build a block retaining wall

I sometimes notice people hesitate before starting a project like this. The scale feels larger than it is, at least at first. You look at the slope, the soil, the small shifts after rain, and you start thinking about a stable form that keeps everything in place. I had a similar situation behind my home, and it pushed me to pay closer attention to small details that I used to overlook.
You focus on choosing solid units, setting a base that stays firm, and shaping each layer with care. It sounds simple, though I think anyone who has tried it knows there are moments where you pause and rethink something. The ground might surprise you. A section may sit unevenly. That is normal, and you adjust as you go.
Before anything else, you check the grade and the moisture. A flat trench helps more than people expect. A steady foundation layer, placed slowly and with patience, keeps the upper units aligned. Perhaps you have a tight space or a slope that drops faster than you like. You work with what you have, and the project starts to feel manageable once the first row sits straight.
Shaping a Ground Support Structure
You create a setup that holds soil in place with solid units arranged in a steady pattern. I sometimes think the first look at the slope feels harder than it actually is. Once you check the grade and moisture, the steps start to feel clearer. You can compare unit options through retaining wall blocks in Calgary, which helps you see what fits your space.
Forming the Base
You clear the area, then cut a trench that sits level. A steady base layer supports the first row. I noticed that taking a bit more time here saves you trouble later
Choosing Suitable Unit Types for Soil and Site Conditions
You match each unit material to the ground around it. I find this part a bit slow at times, though it helps you avoid problems later. Your slope, moisture levels, and the height of your structure all shape your choice.
You can look at a few common options and compare what each one offers. Some feel heavier, some stack more easily. The right pick depends on what your yard holds.
- Concrete units handle steep grades and sit firmly once placed.
- Natural stone gives a varied look, perhaps better for smaller spaces.
- Interlocking shapes create a steady pattern that works well on uneven ground.
Your soil also affects how well each type performs. Clay holds water and may push against your structure. Sand drains faster and puts less pressure on each course. I often test a small patch with a shovel, just to get a sense of how tight or loose it feels.
You then check the slope. A sharper grade may need shorter units with a wide base. A mild grade allows taller pieces that stack without shifting. Your choice shapes how much prep you complete before setting the first course.
Preparing the Trench and Base Layer for Stable Unit Placement
Creating a steady foundation starts with a clear, level trench. I often see people rush this part, but taking time here saves problems later. You remove loose soil, check the slope, and make sure the trench width matches your chosen units. You can find quality options through retaining walls in Calgary, which helps with matching size and style.
Layering the Base
Once the trench is ready, you add a base layer of compacted gravel or crushed stone. This spreads weight evenly and improves drainage. I sometimes press each section with a small tamper to check firmness. You want minimal shifting before you add the first row of units.
Checking Alignment
Keeping the first course level is critical. You use a string line or straightedge to follow the trench line. Minor adjustments now prevent bigger corrections later. I often step back and glance at the line from a distance to see if anything tilts unexpectedly.
| Step | Action | Tip |
|---|---|---|
| 1 | Clear trench | Remove loose soil and debris |
| 2 | Level base | Use gravel and compact it firmly |
| 3 | Check alignment | Use string line or straightedge |
| 4 | Inspect slope | Ensure trench follows desired grade |
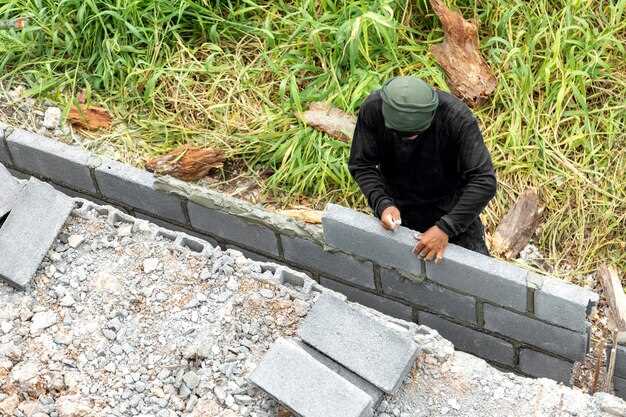
Aligning, Stacking, and Backfilling Units to Maintain Stability
Placing each piece correctly is critical. I often check alignment twice, since even a slight shift can create issues higher up. Using a level and string line helps, and you can compare products through retaining wall in Calgary to ensure the sizes match your design.
Stacking proceeds carefully, one layer at a time. I like to offset each row slightly, which adds strength. Sometimes a unit sits unevenly, and a small adjustment keeps everything aligned. Patience here really pays off.
Backfilling behind each course is next. You add gravel or soil in layers, compacting lightly. This reduces pressure and prevents movement. I tend to pause after every few courses to step back and look for slight tilts, adjusting as needed.
- Check each unit for level and straightness before moving on.
- Offset layers to distribute weight evenly.
- Compact fill behind every two or three rows.
- Monitor slope and alignment visually from a distance.
Installing Drainage Components to Prevent Pressure Buildup
Proper drainage behind your structure reduces pressure and prevents shifting. I usually start by placing perforated pipes at the base, covered with gravel. This allows water to flow away and keeps the soil stable. You can explore options through landscaping and retaining walls to see what fits your design and site.
Setting Pipes and Gravel
You position the pipe along the back of the first course, making sure it slopes slightly downhill. I often check the gradient with a level. Gravel covers the pipe, forming a layer that filters water and supports the soil above. Small adjustments now save a lot of trouble later.
Backfilling and Compacting
After the drainage layer is in place, you add soil gradually, compacting lightly. I sometimes pause after every 30 centimetres to check firmness and alignment. This step prevents bulging and keeps the structure steady over time.
- Place perforated pipe at base with slight slope
- Cover with gravel to filter water
- Add soil in layers, compacting lightly
- Check for firmness and alignment as you go
Q&A:
What type of material should I choose for a garden structure that holds soil?
Choosing the right material depends on your soil type and slope. Concrete units are common because they handle steep grades and heavy soil well. Natural stone works better for smaller structures or gentle slopes. You should also check moisture levels and drainage, since clay can push against the structure more than sandy soil. I often test a small section before committing to the full project.
How deep should the base trench be for proper stability?
The trench depth depends on the height of the structure. A shallow setup may work for low rises, around 15 to 20 centimetres, but taller installations need a deeper base, sometimes 30 centimetres or more. I usually level the trench carefully and compact gravel in layers to prevent settling. Even a small misalignment can cause issues later.
What is the best way to keep each course straight and aligned?
You use a string line or straightedge across each row. I like to check from different angles and step back occasionally; our eyes catch tilts better at a distance. Offsetting layers slightly adds strength. Minor adjustments now prevent bigger corrections after adding several rows.
How can I prevent soil pressure from pushing against the structure?
Installing a drainage layer is key. Perforated pipes at the base, covered with gravel, allow water to move away. Then, backfill gradually and compact lightly in layers. I pause every 30 to 40 centimetres to make sure the structure stays firm and aligned. Without this, soil can push and cause bulging over time.
Can I manage this project on my own or should I hire professionals?
It depends on the size and slope. Small, low installations might be manageable alone, but taller setups or uneven ground benefit from experience. Professionals know how to prepare the base, align units, and install drainage properly. I think even if you have some skills, having guidance can save time and prevent mistakes that are hard to fix later.
What is the recommended slope for soil behind a support structure?
The slope of soil behind the installation affects stability. A gentle incline reduces pressure on the units and allows water to drain naturally. I often leave a 1:3 slope, meaning one vertical to three horizontal, which seems to work for most backyards. Steeper angles may need extra support or drainage to avoid shifting over time.
Which tools are necessary to keep layers level and aligned?
Keeping layers straight requires simple but precise tools. A string line, level, and measuring tape are key. I usually check alignment from several angles as I go. Even minor unevenness early on can cause bigger issues later. Some people add a rubber mallet to tap units gently into place; it’s a small detail, but it helps maintain uniformity without damaging the surface.


