
How to build steps/stairs with retaining wall blocks

I’m Greg at Sungreen Landscaping Inc, and I’ve been putting in outdoor spaces around Calgary since 1990. One thing I keep seeing is people stacking up a little rise in the yard and calling it good, then the first spring thaw shows them where the weak spots are. You get a tread that settles, a riser that kicks out, and suddenly the “easy weekend project” turns into mud, rework, and a sore back.
If you’re tying a set of risers into a soil-holding structure, the two need to act like they belong together, not like two separate projects jammed into the same corner of the yard. Base prep, drainage gravel, and compaction matter more than the face units you picked at the store, most of the time anyway. If you want the broader primer on the vertical section itself, we’ve got a guide on how to build a retaining wall, and it helps connect the dots before you start setting the first course.
Some yards call for a different look, and timber can make sense where you want a warmer feel or you’re matching an older deck. I’ve seen wood jobs last a long time when they’re detailed properly, and I’ve also seen them fail fast when water sits where it shouldn’t. If that’s the direction you’re leaning, read how to build timber or wood retaining wall and pay attention to drainage and separation from soil, because rot does not care about good intentions.
In this article I’m going to walk you through laying out the rise and run, setting a solid granular pad, and locking the risers into the slope so they don’t creep after freeze-thaw cycles. If you want us to look at your site first, we do free consultations and 2D design samples, and we handle everything from design through construction at our shop in Rocky View County. For taller grade-support structures over four feet we pull the City of Calgary permits and bring in an engineer, no shortcuts there, and every job comes with a signed warranty and a warranty rep. Call (403) 256-7500 if you want to talk it through before you start moving dirt.
How to Build Steps/Stairs with Retaining Wall Blocks
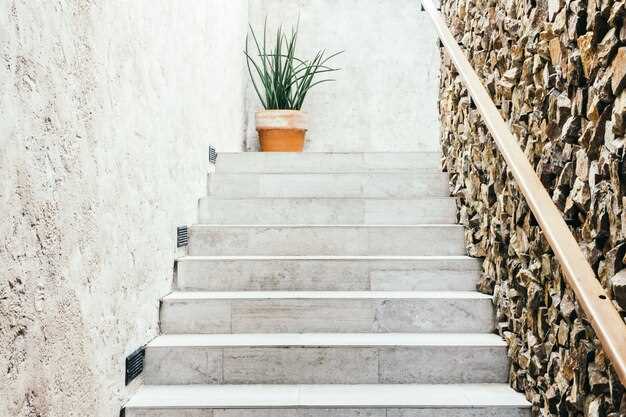
If you’re using segmental concrete units to make a run up a slope, think of it less like “making a staircase” and more like stacking a series of small, level terraces that you can comfortably walk. I’ve seen homeowners try to force tall risers because they want fewer treads. Looks fine on paper, feels awkward underfoot, and winter makes it worse. A calmer rise and a deeper tread usually reads better and walks better.
Before you touch a shovel, figure out what you’re actually constructing. A lot of people treat the side support as decoration, then get surprised when things heave or creep. If you want a plain-language refresher, this page helps: what is a retaining wall. It’s the same idea here, just stepped and tied into the grade.
Layout is where you save yourself pain. Set the width first, then decide the number of risers based on your total height change, not the other way around. In Calgary we also deal with frost movement, so I like to see a consistent tread depth and a consistent rise, because your body notices the odd one out even if you don’t. A string line and a couple stakes sounds old-school, but it keeps the run straight when your eyes start lying to you mid-dig.
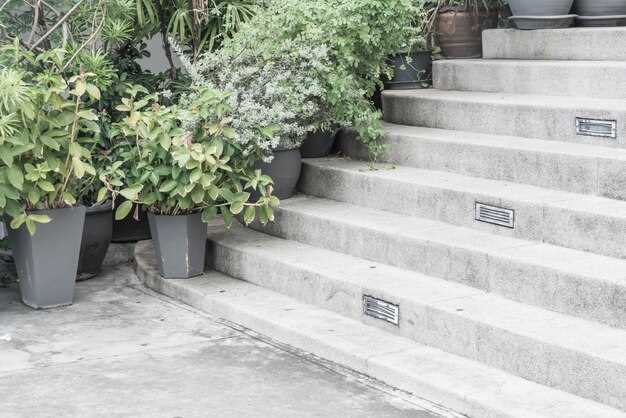
Excavation and base prep are the part nobody wants to spend time on, and it shows later. Dig down to undisturbed soil, then place and compact crushed gravel in lifts. If the ground is soft or you’re working in clay, you might need more gravel than you expected. Most of the callbacks I’ve been on in my career were not about the face units. It was the base. Well, usually anyway.
Each riser course wants to be level left to right and consistent front to back, and you check it every single time. Set the first course carefully because everything above copies it. If you’re using units that have a lip or a locator, keep them clean so they sit tight. A little grit trapped under the front edge can throw off the next tread and you won’t notice until you’re three courses up and wondering why the top looks drunk.
Drainage is not optional. Behind the structure, use clear crush or drainage rock, and add a perforated pipe if water has any reason to collect there. I’ve watched spring melt turn a nice run into a slow slide because someone backfilled straight native soil and called it good. Water builds pressure, pressure pushes, and that’s when joints open up and the face starts to creep forward.
Treads can be finished a few ways. Sometimes we cap the tread with a slab or a paving stone, sometimes we use cap units, sometimes compacted gravel is fine for a utility side yard. Whatever finish you choose, keep the tread pitched slightly so water doesn’t sit and freeze. If you’re pairing this run beside other yard features, take a look at our landscaping retaining walls work for ideas on tying the side support into patios and walkways without it looking like an afterthought.
If you’re unsure about heights, soil, or you’re flirting with anything tall, call us. Sungreen’s been doing outdoor projects around Calgary since 1990, and we handle the design, the excavation, drainage, and the finishing pieces so it all fits. For bigger grade changes, permits and engineering come into play and we take care of that. We also include free consultations and a 2D design sample, plus every job gets a signed warranty and a warranty rep. (403) 256-7500 is the office line if you want us to take a look at your yard and tell you what’s realistic.
Measure Rise/Run and Calculate Block Count, Tread Depth, and Step Height
First thing I do on site is measure total rise and total run, because guessing is where people get into trouble. Total rise is the vertical change from the lower finished grade to the upper finished grade. Total run is the horizontal distance you have to work with, measured along the slope, not the diagonal. A straight 2×4 and a level, or a laser if you have one, makes this painless. If you are mixing timber into the plan, think about longevity too, because I have ripped out enough rotten garden edges to be a bit cynical about it. This is a good read: how long will a pressure treated wood retaining wall last.
Once you have total rise, pick a comfortable riser height. Around 150 to 180 mm feels right for most outdoor sets in Calgary, and shorter is usually nicer in winter boots. Divide total rise by your target riser height to get the number of risers, then round to a whole number and recalc the exact riser height so every one matches. Example: 720 mm total rise ÷ 160 mm gives 4.5, so you go to 5 risers at 144 mm each, or 4 risers at 180 mm each. I have seen homeowners do 3 tall risers because it “looks clean,” and then everyone starts stepping awkwardly and scuffing toes.
Now tie that to tread depth using your total run. Take the total run and divide by the number of treads (usually the same as risers, unless the top landing counts differently in your layout). For outdoors, I like deeper treads than inside, 350 to 450 mm is forgiving and handles a bit of ice better. If your math spits out a 250 mm tread, the slope is too tight for comfortable access and you need more risers or a longer footprint, there is no clever workaround that stays safe.
Block count is just volume in disguise, but people still eyeball it and end up short by half a pallet. You calculate the face area first: step height times step width per riser, then multiply by number of risers. Convert that to units using the face area of the unit you are using, and add extra for cuts, corners, and the inevitable “one cracked one” from handling. Price is part of the planning too, because swapping unit sizes later can throw everything off. Here is our cost breakdown page: how much are retaining wall blocks.
Don’t forget the buried first course (or the buried portion of your base row) when you’re counting height. That hidden piece still uses units and still affects your final riser height if you set it wrong. On jobs where the lower grade is a bit soft, we often dig down more, set a thicker compacted road crush base, then the first row sits lower than a homeowner expected, and suddenly the top elevation is off by 40 mm. You can “fix” that later, but it shows, and it usually turns into extra cutting.
If the numbers are getting messy, or you are dealing with a taller structure, a curve, or a tight property line, you might be better off having someone lay it out and sanity-check it before you order material. We do that kind of layout all the time, and we also handle design through construction, permits for anything over 4 feet, and warranty sign-off after. If you want a crew instead of a weekend project, this page is the right place to start: retaining wall contractors.
Questions and answers:
How do I figure out the right step height and tread depth when using retaining wall blocks?
Use the total rise (height from the lower grade to the upper grade) and divide it into equal steps. A comfortable outdoor riser is usually about 5–7 inches (125–180 mm). For the tread (the part you step on), aim for about 12–16 inches (300–400 mm) of “usable” depth. Many block steps end up deeper because you may set blocks back and fill behind them; that’s fine as long as the front edge-to-front edge depth feels natural. Keep every riser the same height—small differences are what make stairs feel awkward and become a trip hazard.
What should the base look like under the first step, and how deep do I dig?
Excavate to undisturbed soil, then build a compacted base that won’t settle. A common approach is 4–6 inches (100–150 mm) of compacted crushed stone (like 3/4″ minus), topped with about 1 inch (25 mm) of leveling sand or stone screenings if your block system allows it. The first course should be partially buried: often about 10% of the total wall height, and for steps that usually means burying the bottom block so the first riser is stable and doesn’t slide forward. Dig deep enough to fit the buried portion plus the base layers, and make the trench wide enough for the block plus a little room to level and adjust.
Do I need geogrid for stairs made from retaining wall blocks?
Sometimes. If the steps are short (a few risers) and built into a compacted slope with proper base, backfill, and drainage, many systems don’t require geogrid. If the stair structure is tall, supports a landing, sits on weak soil, or is tied into a retaining wall that needs reinforcement, geogrid is often part of the design. The safe way is to follow the block manufacturer’s charts for height and loading, and check local code requirements. When used, the grid should extend back into the slope and be sandwiched between block courses as specified, with compacted aggregate fill locking it in place.
How do I handle drainage so the steps don’t heave or wash out?
Water control is what keeps block stairs stable. Use free-draining crushed stone behind and under the blocks, not soil. If the steps are against a cut slope or connect to a wall, add a perforated drain pipe at the lowest practical point, wrapped in filter fabric and bedded in gravel, and give it a place to daylight. Pitch each tread slightly forward (about 1–2%) so water runs off the face instead of pooling. Also avoid trapping water behind the risers: fill and compact in thin lifts, and keep fines (topsoil) out of the drainage zone so it doesn’t clog over time.
Can I build these steps on a slope without a concrete footing, and how do I keep them from creeping forward?
Yes, many retaining wall block stair builds use a compacted crushed-stone base rather than poured concrete, but the base has to be done carefully. Key points: (1) Bury the first course, (2) use well-graded base stone compacted in layers, (3) step each course back into the slope (a setback) so gravity helps lock the stair into the hillside, and (4) backfill behind every riser with compacted gravel. If your blocks have pins/lips, use them as intended; if they’re smooth-faced, a construction adhesive rated for masonry can help bond cap units and reduce shifting. For taller stair runs, a landing breaks up the load and helps with stability, and tying the stair into adjacent reinforced wall sections can prevent movement.

