
How to build a rock retaining wall

Sloped ground looks harmless until it shifts. Many Calgary homeowners notice it after a wet spring or a fast snowmelt. Soil creeps forward. Edges soften. Patios settle a little lower than they used to. You might stand there one evening and think, this was not like this last year. That moment usually leads to questions about adding a stone support structure to hold everything in place.
This type of project feels straightforward at first. Stack natural stone. Add fill behind it. Done. In practice, it asks for more thought. Depth below grade matters. Drainage paths matter more than people expect. A structure that stands firm in July can lean by March if water has nowhere to go. I have seen that happen, and it is frustrating to watch.
At Sungreen Landscaping Inc, we deal with these issues across Calgary. Clay soil. Freeze and thaw cycles. Heavy loads after snow piles up. You plan during warm weather, but winter tests the result. Some homeowners want to handle the work themselves. Others want to understand the process before hiring a crew. Both approaches start with the same need, clear expectations.
If you are thinking about adding a stone barrier to your yard, pause before the first shovel hits the ground. Size, material choice, and water control shape the outcome years later. A few inches off can change everything. That detail is easy to miss early on. It becomes very obvious later.
Assembling a Stone Support Barrier on Sloped Ground
Before any materials arrive, you need a clear layout. Walk the slope. Mark the line where the stone barrier will sit. Spray paint works. Stakes and string help more. Keep the line straight, or gently curved, but decide early. Changes later cause uneven spacing and weak points. You want the base set back slightly into the slope, usually about one inch per foot of height.
Base preparation and ground depth
Digging takes longer than expected. That is normal. The trench should reach below frost depth for Calgary, often close to four feet for taller structures. For shorter ones, you still need compacted gravel under the first course. About six inches works for most yards. Pack it tight. Loose base material leads to movement after winter.
Check level often. Side to side matters more than front to back at this stage. If the base is off, every stone above it will fight you. That gets tiring fast.
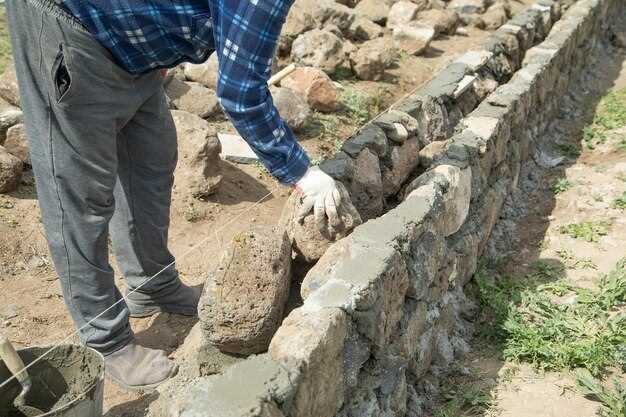
Placing stone and managing backfill
Set the largest pieces first. Flat faces outward. Each piece should lean slightly into the slope. Gravity helps more than people think. Avoid stacking vertical seams. Stagger joints like brickwork. It adds stability.
As you place each course, add clear gravel behind it. This creates a drainage zone. Without it, water pressure builds. That pressure causes forward shift. A simple perforated pipe at the base helps move water away. It costs little and saves repairs later.
If you are unsure at any step, pause. Many homeowners call Sungreen Landscaping Inc at this point. Sometimes for advice. Sometimes to take over. Both are fine. Fixing mistakes after soil settles costs more than slowing down early.
Site setup and size planning before any digging
Preparation decides whether a stone support structure stays straight or starts leaning after a few seasons. Walk your yard first. Look at where soil drops, where water collects, and where foot traffic passes. Mark the line with stakes and string. Keep it simple. Curves look nice, but they add measuring problems.
Next comes height and length. Measure from the lowest grade to the top point where soil needs support. Use a tape, not estimates. For most Calgary yards, anything over three feet raises red flags. Taller structures face more pressure from soil and moisture. That often means added engineering or permits. If you are unsure, this guide on do i need a permit for a retaining wall clears up local rules.
Understanding slope and soil load
Slopes change calculations. A gentle grade needs less setback. Steeper ground needs more. A common rule is one inch of setback for every foot of height. Clay soil pushes harder than sandy fill. After snowmelt, that pressure increases fast. This article on how to build a retaining wall on a slope explains why grade matters so much.
Drainage space also counts toward width. Plan room behind the stone face for clear gravel and pipe. Skip that, and water has nowhere to go. That mistake shows up within a year.
Comparing materials and layout options
Natural stone behaves differently than concrete units. Weight varies. Shapes vary. Gaps appear where you do not expect them. If you are comparing approaches, this overview on how to build a block retaining wall helps explain spacing and base needs.
Once numbers are clear, sketch everything. Height. Length. Trench depth. Material quantities. It feels slow, I think, but fixing layout errors later costs more. Many Sungreen Landscaping Inc projects begin with correcting skipped prep work. Planning first saves effort later.
Selecting and setting stone pieces for long term stability
Material choice affects everything that follows. Natural stone varies in size, weight, and face shape. That is part of the appeal, but it also creates challenges. Look for pieces with at least one flat side. Irregular shapes work, but they slow placement and increase gaps. Heavier pieces belong at the base. Lighter ones sit higher. Your back will tell you why.
Cost comes into play as well. Prices vary by type and availability. If you are comparing stone to manufactured units, this breakdown on how much are retaining wall blocks helps frame the budget side of the decision.
Placement order and joint spacing
Set the first course with care. This row carries the load above it. Check level after every piece. Side to side first. Front to back second. Each stone should touch its neighbour firmly. Avoid long vertical seams. Stagger joints where possible. That pattern spreads weight and reduces movement after freeze cycles.
Lean each piece slightly into the slope. A small tilt works. Too much looks forced. Gravity helps hold everything together. Without that lean, pressure from soil pushes forward over time.
Level checks and when to pause
Use a short level, not a long one. Short tools read surface contact better on uneven stone. Check often. Adjust early. Shims made from small stone chips help fine tune height. Do not rely on soil or gravel to correct level after placement.
If alignment keeps drifting, stop. That is usually a sign the base is off. Many homeowners reach out to retaining wall contractors at this stage. Sungreen Landscaping Inc often steps in here. Sometimes a reset saves the whole structure.
Installing drainage and backfill to prevent structure movement
Water is the main reason stone structures shift over time. Proper drainage prevents pressure buildup behind the installation. Start with a trench behind the first course of stones. Place coarse gravel about six inches deep along the base. This layer moves water away from soil and stones.
Adding a perforated pipe improves flow. Run it along the trench at the base, angled slightly toward a safe exit point. Cover the pipe with gravel, then larger stone or gravel up to the slope line. That combination keeps water from pressing directly on the structure.
Backfill placement matters as well. Do it in layers. Compact lightly after each layer. Avoid dumping soil in one step. That can create voids and uneven pressure. Light compaction gives support without stressing stones. Pay attention to:
- Layer thickness, ideally 4–6 inches per pass
- Type of fill, prefer coarse gravel or sandy mix for drainage
- Regular leveling after each layer
Check alignment often. Small shifts in early stages compound quickly. If you notice leaning, pause and adjust. It is easier than correcting later. For larger projects or uncertain slopes, contacting Sungreen Landscaping Inc ensures proper installation. Their team handles drainage, compaction, and placement safely and reliably.
Questions and Answers:
What type of stone is best for a home soil barrier?
Choosing the right material depends on weight, size, and shape. Flat-faced stones are easier to stack and maintain alignment, while irregular ones can add visual interest but require careful placement. Heavier stones belong at the base to support the weight above. Some homeowners mix sizes, but consistent layers reduce shifting over time. Also consider local availability since hauling heavy materials can increase cost significantly.
How deep should the trench be for a structure on a sloped yard?
Depth depends on height and soil type. For short structures, six to twelve inches of compacted gravel might suffice under the first course. Taller installations often require digging below frost line, sometimes up to three or four feet in Calgary. The trench must be level side-to-side, slightly set back into the slope, and firm. If the base is uneven, every stone above will be harder to align, and shifting may occur after winter.
What is the best way to handle water behind the stone barrier?
Drainage prevents pressure that causes stones to move forward. Start with a coarse gravel layer along the base, then add a perforated pipe running toward a safe exit. Cover the pipe with gravel and then backfill. Avoid using only soil, as it traps water and increases lateral force. Compact the backfill in thin layers, checking alignment frequently. Proper drainage often makes the difference between a structure that lasts ten years and one that leans after the first heavy melt.
Can I place stones myself, or should I hire experts?
You can handle small projects on your own, especially if the structure is under three feet. But for taller barriers, uneven ground, or heavy materials, professional help is wise. Experienced crews ensure proper leveling, correct backfill, and effective drainage. Companies like Sungreen Landscaping Inc manage all stages safely, and they know how local conditions affect long-term stability. Some homeowners start themselves but call in contractors when alignment or drainage becomes tricky.
How do I estimate the number of stones or blocks needed?
Measure the height, length, and average thickness of the intended structure. For natural stones, consider the size variation; smaller pieces leave gaps and may require more units. For manufactured blocks, check manufacturer specifications for coverage per piece. Include extra for mistakes or irregular shapes—usually 5 to 10 percent more than calculated. Comparing costs early, using resources like how much are retaining wall blocks, helps plan both budget and material orders without surprises.


